train_dataset = fetch_20newsgroups(subset='train')
test_dataset = fetch_20newsgroups(subset='test')In this post, I will explore how to deploy a real-time machine learning model using AWS Lambda and API Gateway. I will go over the following points:
- Real-time vs batch models
- AWS Lambda and API gateway for model deployment
- Building a Scikit-learn text classifier
- Building a Docker image for Lambda including that model
- Creating and invoking a Lambda function using that image
- Creating an API Gateway REST endpoint using that Lambda
- Testing the endpoint with POST requests
If you just want the reproducible code, check out the raw notebook here.
Before we get to the technical details, why did I decide to write a post and make a PyData presentation about serverless deployment?
Motivation
First data scientist role
In my first data scientist role, I was tasked with shipping a credit card fraud model. Long story short, I built a good enough model using PySpark that would have significant impact on the bottom line ($). To deploy it, a machine learning engineer (MLE) had to work full-time for months to build a model serving framework using Scala. To bridge the gap between Python and Scala, the models had to be serialized using MLeap. Why not use a Python server, something I had experience with? The company simply wouldn’t allow non-JVM servers in prod! There had to be a better way.
Failed side hustle
Later, I learned about AWS Lambda and realized I could have deployed the fraud model using it. It would run Python code, but not need a Python server or any associated infrastructure. This led me to the idea of creating a side hustle called Deploir:
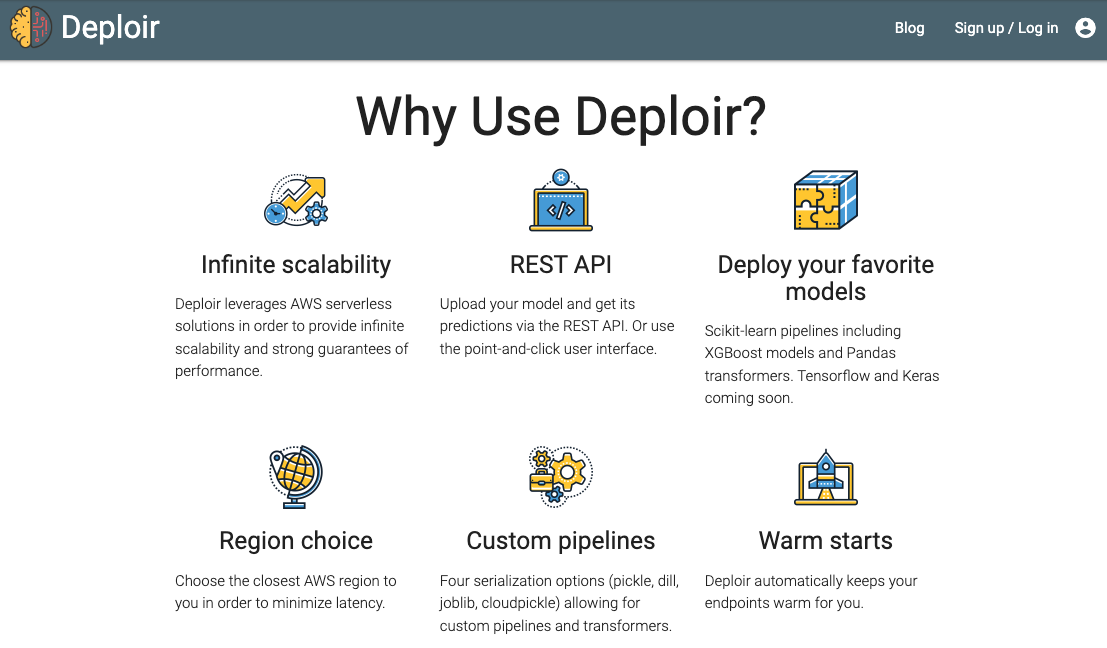
The idea was simple: a data scientist trains a model, generates a pickle, uploads the pickle to the website using a GUI, and 1 minute later they have an endpoint ready to be used at scale. Technically, the idea was sound and the prototype worked. Commercially, I couldn’t get one single conversion. Deploir taught me many valuable lessons about overbuilding (see this tweet for a hilarious and maximalist view). But it also taught me how to deploy real-time models using serverless tech, which I intend to share now.
Summary
Here is a summary of what we’re about to explore in this post:
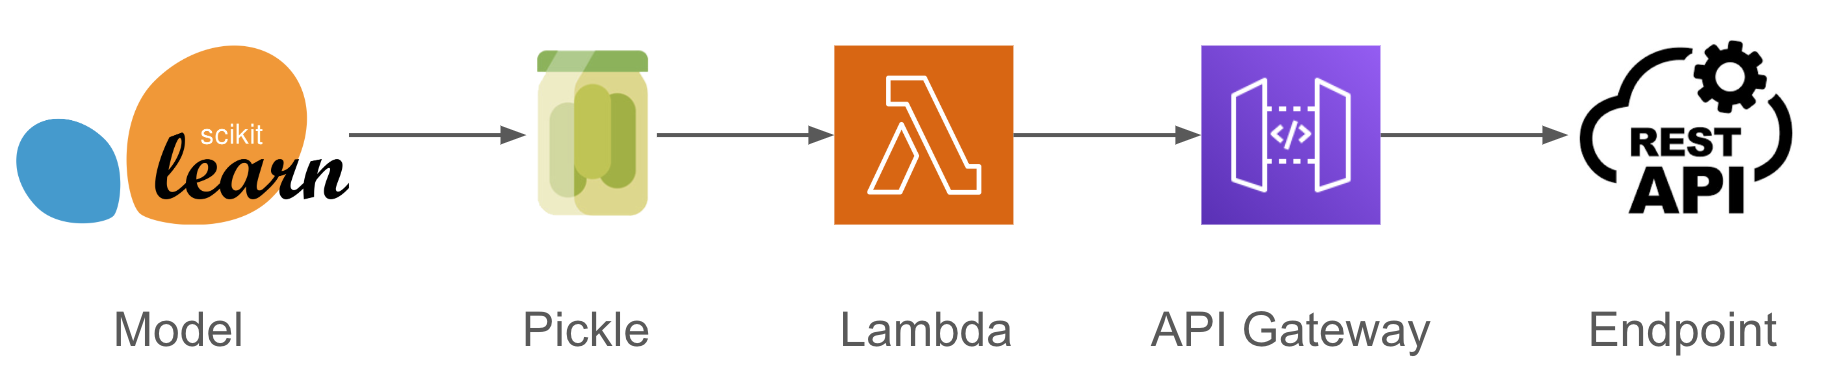
I will show how to go from a Scikit-learn model (but could be XGBoost, LightGBM, Tensorflow, etc) to a REST endpoint in three steps: Pickle the model, create a Lambda function to serve that model pickle, then wrap the function around a POST endpoint using API gateway.
Before we get to the engineering, first I’d like to discuss different model deployments modes (real-time vs batch) to make it clear what I mean by “real-time”, how Lambda and API gateway work and why serverless might be a good idea for some use cases and bad for others.
Real-time vs batch models
Real-time models
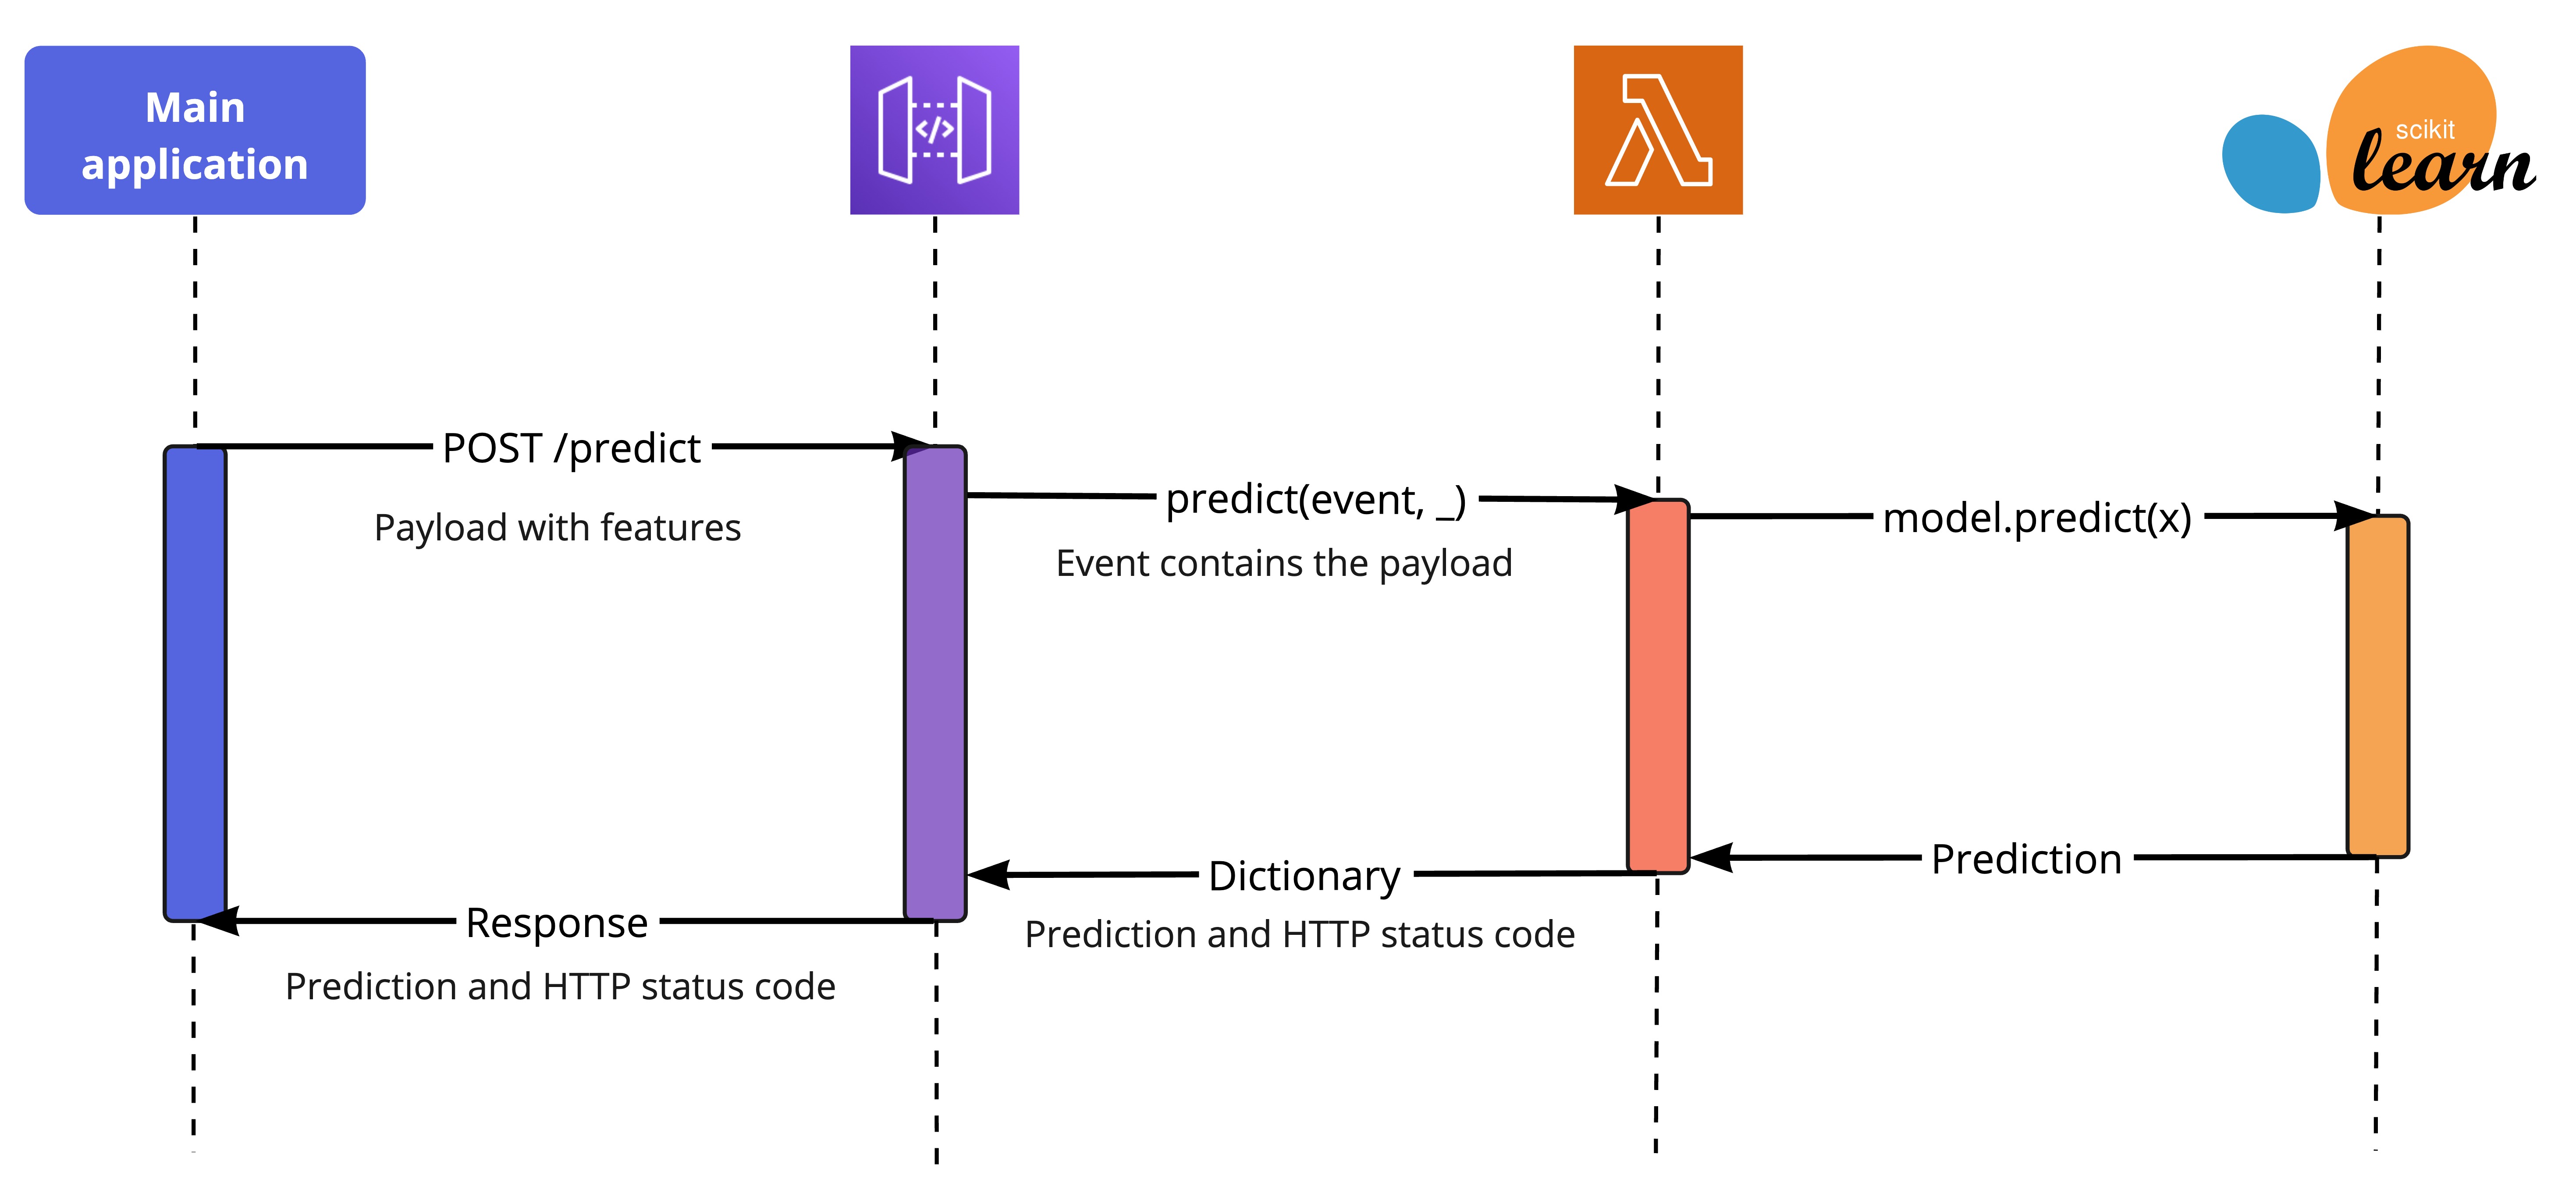
Real-time models serve predictions (almost) instantly. Usually, they serve one prediction at a time as they come. The prototypical real-time ML service in Python is a Flask server running a /predict endpoint that handles POST requests. After receiving a request with features in the payload, the server will process the features (if needed), call the model prediction function (e.g. model.predict(X)) and return the prediction as a JSON HTTP response. Then, the main application will do something with it, like approve or deny a loan. If something fails, the application returns a HTTP error. Check out a minimal example.

There are many other possibilities to serve real-time predictions. You can use a different programming language other than Python by serializing the model in a language-agnostic framework like ONNX. You can use FastAPI instead of Flask, which is becoming more common over time as FastAPI is blazing fast with great Pydantic integration. Or you might use a queue (e.g. Kafka) and handle requisitions asynchronously. The details change, but the principles are similar.
Real-time models have a couple of strong downsides:
- Need to build, manage and maintain an endpoint or web server
- Need to guarantee the feature engineering pipelines are the same for training and serving (which is more difficult than it seems!)
But it’s inevitable for some applications where the most informative features are only received in real-time:
- Credit card transaction fraud
- Real-time bidding for ad auctions
- Chatbots
Be sure to test your need for a real-time model empirically: train a model with just day old features and see how its performance compares to a model with real-time features. You might be surprised by how far “stale” features go.
Batch models
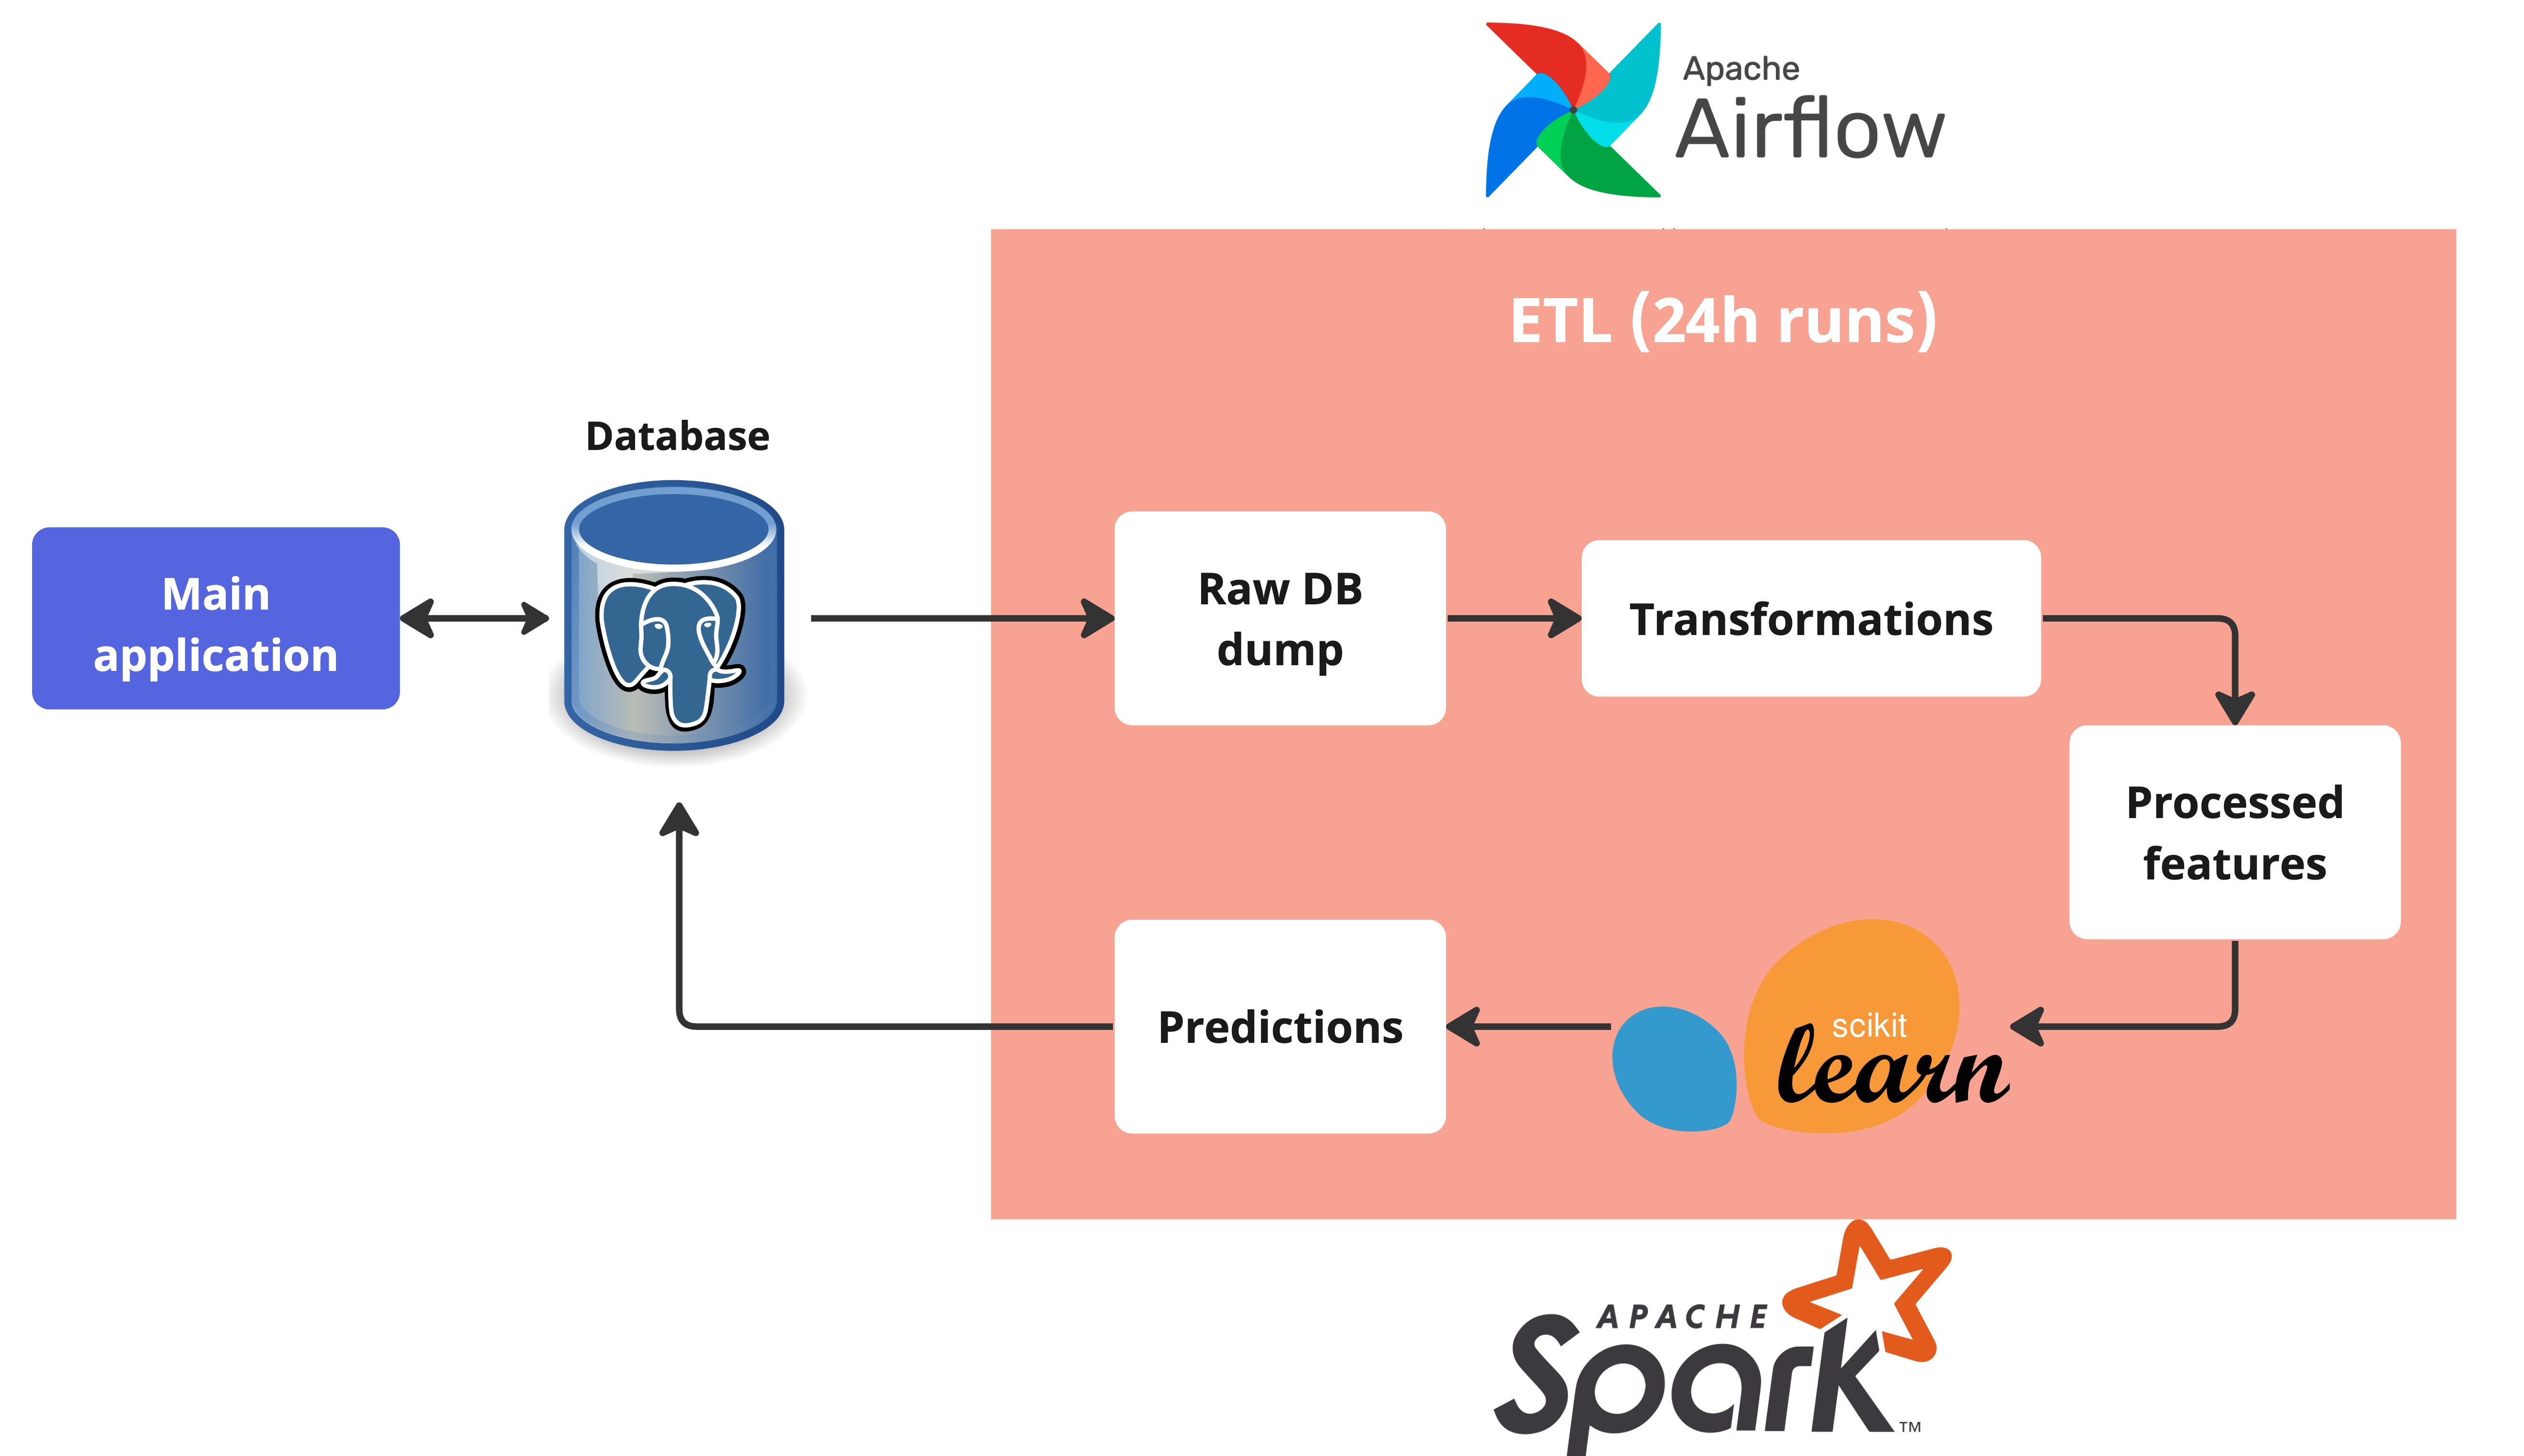
Batch models serve predictions in batch (duh) and generally at a regular frequency, typically every 24h. Those models are usually part of the data pipeline or ETL process. The prototypical batch ML architecture in Python is a Spark pipeline controlled by Airflow (or Snowflake controlled by DBT) that reads from production databases, makes all kind of data transformations, and somewhere along the way calls the model to make predictions, which are then pushed back to a production database to be used by the main application:
Use batch models if you can: you train models in batch after all! With batch models, it’s much easier to ensure the feature pipelines for training and serving are the same. You don’t have to maintain a web server or endpoint, only one or a few steps in the data pipeline. You can leverage everything the data engineers build in your favour.
What are some typical batch model applications?
- Predicting churn in a B2B SaaS company
- Calculating credit scores
- Estimating Lifetime Value (LTV) of users
Hybrid models
Since real-time models are sometimes inevitable (but be sure to test this assumption!) and batch models are easier to maintain, you can get the best of both worlds by chaining them together. For example, for a loan application, you can have a credit risk model that runs in batch based on past user behavior and external information like credit scores and another model running in real-time that uses the batch model as a feature plus other variables which are only available online (such as the loan amount). This offloads most of the complexity to the batch model, with the downside of having two models instead of one and having one depend on the other (so watch out for overfitting and leakage if the models re-use the same training examples).
AWS Lambda
AWS Lambda allows you to run functions on the cloud without having to manage webservers. You send a Python function to AWS and, one minute later, can invoke it from anywhere. Lambda has strong but not unlimited scalability, so you generally don’t have to worry about up or downscaling servers to handle variable load.
Most importantly, you only pay for what you use. The cost is proportional to the time spent in each function call. The price varies by other things such as memory used and network traffic, but you can use the following rule-of-thumb as a ballpark estimate for a typical workload: ~1M requests → $1.
You can create Lambda functions manually in the web interface or programatically using boto3. I strongly recommend the latter: you get reproducibility and more explicit control. There are two ways to create a Lambda function:
- Zipping your script and artefacts (including library dependencies) into a file
- Creating a Docker image with your script and artefacts

I highly recommend going with option (2): Python libraries for ML are quite large and will create an unreasonably large zip file, which may exceed the standard Lambda limits. With a Docker image, you can install libraries with a requirements.txt file and the limits are much looser (the image can be up to 10g). Also, a Docker image is reproducible with a Dockerfile and allows for local testing with the exact same behaviour as production.
When I first built Deploir, only zipping was available. One of my technical breakthroughs was compressing the numerical and ML libs to make them fit the file size and memory constraints. I hope nobody else has to experience the same pain again!
API Gateway
API Gateway allows you to wrap an endpoint around a Lambda function. There is no code involved, only configuration. You just specify you want to create a REST API with a POST endpoint using a certain Lambda function and the integration is done by AWS. You get one million requests for free every month and for subsequent use you pay $3.5 per million requests.
Use API Gateway to distribute and control usage of Lambdas inside and outside your org. You can define API keys to use the endpoint with associated usage plans where you can set rate limits, throttling and quotas. The integration between API gateway and Lambda is seamless: it will pass along the request payload to the Lambda function event argument and it will return the request response from the Lambda return dictionary:
Note that there are two situations where you wouldn’t need to use API gateway:
- If you only call the Lambda inside your org, so you can invoke it directly with
boto3or another AWS library - If you use Lambda function URLs to distribute your Lambda, which I wouldn’t recommend since API Gateway is already simple enough to use, quite cheap, and offers you more control
Trade-offs
Going serverless has many trade-offs. Check out When (and why) not to go serverless for a more general take. For ML deployment, we can be more precise about the trade-offs we face:
Why serverless model deployment?
You should go serverless if you cannot bear the costs of maintaining a Python server, whether they are the server cloud costs if you’re a poor entrepreneur, the human-engineering costs if you need to build a fancy Scala server (when Python is not allowed), or the time costs of managing a server yourself. Here are some examples that all have applied to me personally to go with Lambda in the past:
- You are a data scientist (DS) and need to deploy a model but Python servers are not allowed
- You are an indie hacker and want to sell something with high scalability but no baseline costs
- You are a MLE and want to create a system where DSs send a model and get an endpoint back in seconds
Why not?
You should choose boring technology by default. If you can use Flask for your real-time model, do it! There will be a lot more resources, examples, and people with tacit knowledge and experience out there.
If your application has tight latency requirements, say you work with real-time ad auctions, the latency spikes from Lambda cold start might cause issues. You can prevent this by keeping the function warm manually, but this is hackish without any guarantees from AWS. You can provision concurrency, but you will pay for it, so the solution becomes less cost-effective.
If you operate at absurd scales like Prime Video, Lambda might not be cost-effective anymore since there are slight inefficiencies in the serverless model that are only apparent at scale. However, if the load varies a lot and unpredictably, Lambda can still outperform traditional web servers.
If you are at the limits of technology, say running LLMs inference on GPUs, it’s not even possible to start using Lambda in the first place.
Model example
Now let’s go over the process of building and deploying a serverless model. First, we need to train a ML model:
Scikit-learn text classifier
Let’s build a text classifier using Scikit-learn. If you just want to see the AWS part, skip to the next section. First, I load the 20 Newsgroups dataset:
print(train_dataset.DESCR[:1086]).. _20newsgroups_dataset:
The 20 newsgroups text dataset
------------------------------
The 20 newsgroups dataset comprises around 18000 newsgroups posts on
20 topics split in two subsets: one for training (or development)
and the other one for testing (or for performance evaluation). The split
between the train and test set is based upon a messages posted before
and after a specific date.
This module contains two loaders. The first one,
:func:`sklearn.datasets.fetch_20newsgroups`,
returns a list of the raw texts that can be fed to text feature
extractors such as :class:`~sklearn.feature_extraction.text.CountVectorizer`
with custom parameters so as to extract feature vectors.
The second one, :func:`sklearn.datasets.fetch_20newsgroups_vectorized`,
returns ready-to-use features, i.e., it is not necessary to use a feature
extractor.
**Data Set Characteristics:**
================= ==========
Classes 20
Samples total 18846
Dimensionality 1
Features text
================= ==========To make the model outputs more interpretable and illustrative, I will only work with the classes as strings (e.g. "rec.sport.hockey") instead of numerical labels (e.g. 3).
X_train = train_dataset.data
y_train = np.array([train_dataset.target_names[i] for i in train_dataset.target])
X_test = test_dataset.data
y_test = np.array([test_dataset.target_names[i] for i in test_dataset.target])print(f"Train size: {len(X_train)}, test size: {len(X_test)}")Train size: 11314, test size: 7532Now, let’s build our model. Modelling is not so important for the purpose of this post, but TF-IDF + Logistic Regression is always a good idea for text classification. This is a bag-of-words approach: we will treat the words independently and the model will have to makes its predictions based on the presence or not of certain keywords. Logistic regression works well for sparse features, which is the outcome of a bag-of-words featurization. Alternatively, another strong baseline would be Naive Bayes.
tfidf = TfidfVectorizer(max_df=0.5, min_df=2, stop_words='english', use_idf=True)
lr = LogisticRegression(C=1e2, solver='lbfgs', multi_class='multinomial', max_iter=1000, random_state=42, n_jobs=16)
le = preprocessing.LabelEncoder()
pipe = Pipeline([('tfidf', tfidf), ('lr', lr)])pipe.fit(X_train, le.fit_transform(y_train))Pipeline(steps=[('tfidf',
TfidfVectorizer(max_df=0.5, min_df=2, stop_words='english')),
('lr',
LogisticRegression(C=100.0, max_iter=1000,
multi_class='multinomial', n_jobs=16,
random_state=42))])In a Jupyter environment, please rerun this cell to show the HTML representation or trust the notebook. On GitHub, the HTML representation is unable to render, please try loading this page with nbviewer.org.
Pipeline(steps=[('tfidf',
                 TfidfVectorizer(max_df=0.5, min_df=2, stop_words='english')),
                ('lr',
                 LogisticRegression(C=100.0, max_iter=1000,
                                    multi_class='multinomial', n_jobs=16,
random_state=42))])TfidfVectorizer(max_df=0.5, min_df=2, stop_words='english')
LogisticRegression(C=100.0, max_iter=1000, multi_class='multinomial', n_jobs=16,
                   random_state=42)
preds = pipe.predict(X_test)
ground_truth = le.fit_transform(y_test)
print(f"Accuracy is {100.0*accuracy_score(preds, ground_truth)}%")Accuracy is 84.59904407859798%We have 84.6% accuracy, but is that good? Accuracy is highly sensitive to class balance, so let’s take a look at the class proportions of the test set:
pd.Series(y_test).value_counts(normalize=True)rec.sport.hockey 0.052974
soc.religion.christian 0.052841
rec.motorcycles 0.052841
rec.sport.baseball 0.052708
rec.autos 0.052576
sci.crypt 0.052576
sci.med 0.052576
comp.windows.x 0.052443
sci.space 0.052310
comp.os.ms-windows.misc 0.052310
sci.electronics 0.052177
comp.sys.ibm.pc.hardware 0.052045
misc.forsale 0.051779
comp.graphics 0.051646
comp.sys.mac.hardware 0.051115
talk.politics.mideast 0.049920
talk.politics.guns 0.048327
alt.atheism 0.042353
talk.politics.misc 0.041158
talk.religion.misc 0.033324
Name: proportion, dtype: float64Great, this means choosing the most common class would only yield 5% accuracy. We can also look at the literature and see that a much more sophisticated approach using Deep Learning achieves 89%, not that far from our simple bag-of-words + linear classifier. Now let’s take a look at some predictions:
pipe.predict(X_test)array([ 7, 1, 0, ..., 9, 12, 15])Oh no, we’re getting numbers instead of actual classes. For deployment, we don’t want the classifier to spit a number between 0 and 19. If it’s a customer facing endpoint, we’d rather make an actual prediction a human can read. To do so, we will need to augment our pipeline with an inverse label encoder which maps numeric labels into topics strings.
Creating new Scikit-learn transformers / estimators to do so is quite simple:
class InverseLabelEncoder(TransformerMixin, BaseEstimator):
    def __init__(self, le):
        super().__init__()
        self.le = le

    def fit(self, _, y):
        self.le.fit(y)
        return self

    def predict(self, y):
        return self.le.inverse_transform(y)
Since the Logistic Regression will not be the last step of the pipeline anymore, we need to create an “Internal Logistic Regressor”, which behaves as an intermediary pipeline step i.e. it uses the transform method instead of the predict one.
class InternalLR(TransformerMixin, BaseEstimator):
    def __init__(self, lr):
        super().__init__()
        self.lr = lr

    def fit(self, X, y):
        self.lr.fit(X, y)
        return self

    def transform(self, X):
        return self.lr.predict(X)
Now, all we need to do is create a new pipeline that is able to spit out a topic instead of a number:
inv_le = InverseLabelEncoder(le)
ilr = InternalLR(lr)
predict_pipe = Pipeline([('tfidf', tfidf), ('ilr', ilr), ('inv_le', inv_le)])
predict_pipe
Pipeline(steps=[('tfidf',
TfidfVectorizer(max_df=0.5, min_df=2, stop_words='english')),
('ilr',
InternalLR(lr=LogisticRegression(C=100.0, max_iter=1000,
multi_class='multinomial',
n_jobs=16,
random_state=42))),
('inv_le', InverseLabelEncoder(le=LabelEncoder()))])In a Jupyter environment, please rerun this cell to show the HTML representation or trust the notebook. On GitHub, the HTML representation is unable to render, please try loading this page with nbviewer.org.
Pipeline(steps=[('tfidf',
                 TfidfVectorizer(max_df=0.5, min_df=2, stop_words='english')),
                ('ilr',
                 InternalLR(lr=LogisticRegression(C=100.0, max_iter=1000,
                                                  multi_class='multinomial',
                                                  n_jobs=16,
                                                  random_state=42))),
('inv_le', InverseLabelEncoder(le=LabelEncoder()))])TfidfVectorizer(max_df=0.5, min_df=2, stop_words='english')
InternalLR(lr=LogisticRegression(C=100.0, max_iter=1000,
                                 multi_class='multinomial', n_jobs=16,
random_state=42))LogisticRegression(C=100.0, max_iter=1000, multi_class='multinomial', n_jobs=16,
random_state=42)LogisticRegression(C=100.0, max_iter=1000, multi_class='multinomial', n_jobs=16,
random_state=42)InverseLabelEncoder(le=LabelEncoder())
LabelEncoder()
LabelEncoder()
predict_pipe.predict(X_test)array(['rec.autos', 'comp.graphics', 'alt.atheism', ...,
'rec.sport.baseball', 'sci.electronics', 'soc.religion.christian'],
dtype='<U24')Success! Since this post-processing is part of the Scikit-learn pipeline, this means we can bundle all of it together in the deployment process. But first, let’s check we still have the same performance:
print(f"Accuracy is {100.0*accuracy_score(predict_pipe.predict(X_test), y_test)}%")Accuracy is 84.59904407859798%Interpretability with LIME
Before we get to the model deployment, let’s take a look at what the model is doing using LIME. It’s always important to develop an intuition for what the model is doing before using it.
explainer = LimeTextExplainer(class_names=test_dataset.target_names)lime_idx = 2exp = explainer.explain_instance(X_test[lime_idx], pipe.predict_proba, num_features=6, top_labels=2)exp.show_in_notebook(text=X_test[lime_idx])print(f"Actual class: {y_test[lime_idx]}")Actual class: alt.atheismWe can see that presence of keywords such as Atheism, God and Mathew (sic) make the model predict it’s an Atheism mailing list, which unsurprisingly is correct. The fact that we are using an email alias as a predictor shows the limitations of this model and dataset.
Pickle
Finally, let’s save this model for deployment using Cloudpickle. Note that you cannot use the standard library Pickle in this case, since we created a custom class! Cloudpickle works the same way as the regular pickle, but it saves custom classes as well in the pickle. Note that pickles are in general an unsafe form of model sharing since they allow for execution of arbitrary code. Only open pickles of good provenance.
If pickling is infeasible or too unsafe for your use case, you can use a model serialization framework like the aforementioned MLeap and ONNX.
file_name = 'model.pickle'with open(file_name, 'wb') as handle:
cloudpickle.dump(predict_pipe, handle)Deploying the model using serverless AWS
In this section, we will start the actual model deployment process. To run this code, you need have an AWS account and have the credentials in place. For example, you can install the aws command line and run aws configure. Also, you need to change account_id below with your own (don’t worry, account_id is not sensitive information).
region = "eu-west-1"
stage = "test"
endpoint = "predict"
ecr_image_name = "predict-sklearn"
account_id = 339465038532
IAM role
In a real application, you probably want to use Terraform or AWS CloudFormation to manage your infrastructure and cloud permissions. For our standalone example, we can create manually an IAM role that will allow the creation and invocation of Lambdas:
iam_client = boto3.client('iam', region_name=region)# Specify the role name and trust policy for the Lambda service
role_name = 'lambda-exec-role'
trust_policy = {
'Version': '2012-10-17',
'Statement': [
{
'Effect': 'Allow',
'Principal': {'Service': 'lambda.amazonaws.com'},
'Action': 'sts:AssumeRole'
}
]
}# Just need to run it once, otherwise retrieve already existing role
try:
response = iam_client.get_role(
RoleName=role_name
)
except iam_client.exceptions.NoSuchEntityException:
response = iam_client.create_role(
RoleName=role_name,
AssumeRolePolicyDocument=json.dumps(trust_policy),
Description='Execution role for Lambda function',
)# Get the role ARN
role_arn = response['Role']['Arn']
# Attach the AWSLambdaBasicExecutionRole policy to the role
policy_arn = 'arn:aws:iam::aws:policy/service-role/AWSLambdaBasicExecutionRole'
response = iam_client.attach_role_policy(
RoleName=role_name,
PolicyArn=policy_arn
)Lambda
As explained before, there are two ways to create a Lambda function: just zipping all the relevant files together or via a Docker image. The easiest way in general is using a zip file, but the standard Python image won’t contain the necessary libraries for ML such as Numpy or Scikit-learn. While possible to add the libraries to the zip, it’s easier to use a Dockerfile.
We just need to define a Dockerfile, a requirements.txt and the predict.py script that will actually be called by the Lambda:
- Dockerfile: the Docker image definition
- requirements.txt: the libraries used to train your model
- predict_sklearn.py: the script used in the Lambda function
The most interesting part is the predict_sklearn.py function:
import json
import cloudpickle

# By loading the pickle outside `predict`,
# we re-use it across different Lambda calls for the same execution instance
with open('model.pickle', 'rb') as f:
    model = cloudpickle.load(f)

def api_return(body, status):
    return {
        'isBase64Encoded': False,
        'statusCode': status,
        'headers': {'Content-Type': 'application/json'},
        'body': json.dumps(body, default=str)
    }

def predict(event, context):
    if isinstance(event['body'], str):
        try:
            payload = json.loads(event['body'])
        except json.JSONDecodeError:
            return api_return({'error': 'JSON decode error when decoding payload'}, 400)
    elif isinstance(event['body'], list):
        payload = event['body']
    else:
        return api_return({'error': 'Unknown input format'}, 400)

    # Scikit-learn needs a list or array as input
    if not isinstance(payload, list):
        payload = [payload]

    try:
        output = model.predict(payload).tolist()
    except Exception as e:
        return api_return({'error': str(e)}, 500)

    return api_return(output, 200)
Most of the function above is error handling. Essentially, we are loading a model pickle outside the function (so that it’s cached across multiple calls) and calling model.predict inside it.
Docker image
We need to login to ECR (Elastic Container Registry), build the image, tag and then and push it to the registry. Then, this image will be accessible by any AWS service:
# Log in to AWS ECR
os.system(f"aws ecr get-login-password --region {region} | docker login --username AWS --password-stdin {account_id}.dkr.ecr.{region}.amazonaws.com")

# Create ECR repo: only needs to be done once
os.system(f"aws ecr create-repository --repository-name {ecr_image_name} --image-scanning-configuration scanOnPush=true --image-tag-mutability MUTABLE")

# Build Docker image using your local Dockerfile
os.system(f"docker build -t {ecr_image_name} . --platform=linux/amd64")

# Tag you image
os.system(f"docker tag {ecr_image_name}:latest {account_id}.dkr.ecr.{region}.amazonaws.com/{ecr_image_name}:latest")

# Push your image to ECR
os.system(f"docker push {account_id}.dkr.ecr.{region}.amazonaws.com/{ecr_image_name}:latest")
Let’s finally create the Lambda function:
# Set up the Lambda client
lambda_client = boto3.client('lambda', region_name=region)
# Function name (not public facing)
function_name = 'lambda-fn-sklearn-predict'# Retrieve (if already exists) or create a new Lambda function
try:
response = lambda_client.get_function(FunctionName=function_name)
print(f"Lambda function {function_name} already exists")
except lambda_client.exceptions.ResourceNotFoundException:
response = lambda_client.create_function(
FunctionName=function_name,
Role=role_arn,
PackageType='Image',
Code={
'ImageUri': f'{account_id}.dkr.ecr.{region}.amazonaws.com/{ecr_image_name}:latest'
},
Description='SKLearn predict Lambda function',
Timeout=10,
MemorySize=256,
Publish=True,
)
print(f"Lambda function {function_name} created!")Lambda function lambda-fn-sklearn-predict created!The create_function returns instantly but the function will be in the pending state for a few seconds. To be sure, wait 30 seconds before running the invocation command:
time.sleep(30)# Prepare the event to pass to the Lambda function
example = ["""Did that FAQ ever got modified to re-define strong atheists as not those who \
assert the nonexistence of God, but as those who assert that they BELIEVE in \
the nonexistence of God?"""]
# Invoke the Lambda function
response = lambda_client.invoke(
FunctionName=function_name,
InvocationType='RequestResponse',
Payload=json.dumps({"body": example})
)
# Get the response from the Lambda function
result = json.loads(response['Payload'].read())
print(result["body"])["alt.atheism"]Great, now we have a deployed Lambda function that we can use to make predictions! The next step is using API gateway to wrap an endpoint around it.
API Gateway
To create a POST endpoint on API gateway, you will need a few more commands. While the commands below seem overly bureaucratic and hard to remember, consider that you only have to do it once and you can always go to ChatGPT the documentation for help.
# Set up the API Gateway client
apigw_client = boto3.client('apigateway', region_name=region)
# Define the name of the API (not public facing)
rest_api_name = function_name + '-api'# First, lets verify whether we already have an endpoint with this name
response = apigw_client.get_rest_apis()
create_api_gw = True
for item in response['items']:
if item['name'] == rest_api_name:
rest_api_id = item['id']
create_api_gw = False# Create the REST API if it doesn't exist
if create_api_gw:
response = apigw_client.create_rest_api(
name=rest_api_name,
description='API Gateway that triggers a lambda function',
)
rest_api_id = response['id']
# Create a resource
response = apigw_client.get_resources(restApiId=rest_api_id)
root_id = response['items'][0]['id']
response = apigw_client.create_resource(
restApiId=rest_api_id,
parentId=root_id,
pathPart=endpoint,
)
resource_id = response['id']
# Create the POST method
response = apigw_client.put_method(
restApiId=rest_api_id,
resourceId=resource_id,
httpMethod='POST',
authorizationType='NONE', # WARNING: this will allow public access!
apiKeyRequired=True,
)
# Get the Lambda function ARN
lambda_function = lambda_client.get_function(FunctionName=function_name)
lambda_arn = lambda_function['Configuration']['FunctionArn']
# Set up integration with the Lambda function
uri = f"arn:aws:apigateway:{region}:lambda:path/2015-03-31/functions/{lambda_arn}/invocations"
response = apigw_client.put_integration(
restApiId=rest_api_id,
resourceId=resource_id,
httpMethod='POST',
type='AWS_PROXY',
integrationHttpMethod='POST',
uri=uri,
)
# Deploy the API
response = apigw_client.create_deployment(
restApiId=rest_api_id,
stageName=stage,
)
# Create API key
api_key = apigw_client.create_api_key(
name=rest_api_name + '-key',
description='API key',
enabled=True,
generateDistinctId=True
)
# Create usage plan
usage_plan = apigw_client.create_usage_plan(
name='API usage plan',
description='Harsh rate limits and daily quota for public facing API',
apiStages=[
{
'apiId': rest_api_id,
'stage': stage,
},
],
# Very harsh rate limits since this will be public facing
throttle={
'burstLimit': 10,
'rateLimit': 10.0
},
# Low daily limits for the same reason
quota={
'limit': 100,
'period': 'DAY'
}
)
# Associate the usage plan with the API key
response = apigw_client.create_usage_plan_key(
usagePlanId=usage_plan['id'],
keyId=api_key['id'],
keyType='API_KEY'
)
# Grant API Gateway permission to invoke the Lambda function
source_arn = f'arn:aws:execute-api:{region}:{account_id}:{rest_api_id}/*'
response = lambda_client.add_permission(
FunctionName=function_name,
StatementId='apigateway-lambda-invoke-permission',
Action='lambda:InvokeFunction',
Principal='apigateway.amazonaws.com',
SourceArn=source_arn
)# The URL by default will follow this pattern:
url = f"https://{rest_api_id}.execute-api.{region}.amazonaws.com/{stage}/{endpoint}/"
print(url)https://9g9npm4j2h.execute-api.eu-west-1.amazonaws.com/test/predict/Now we have an endpoint in production! Anyone, even you, can use it. To have skin in the game, I’m leaving this endpoint open to the public. Try out make a request yourself. Here is how you can do it:
# WARNING: you shouldn't print or commit API keys in general
# This is for demonstration purposes only
print(f"API key: {api_key['value']}")
API key: Kqrrc4uDk5aFZpH0NLfXW4CvgZphPbrc731nY5Yxheaders = {
'Content-type': 'application/json',
'x-api-key': api_key['value'],
}
resp = requests.post(url, headers=headers, json=example)
resp.json()['alt.atheism']Success! We have an endpoint serving the model at scale without the hassles and costs of running a web server.
Monitoring
We can use AWS CloudWatch to monitor Lambda and API gateway usage, check the logs and create alarms. As a tip from a seasoned AWS engineer, pay special attention to memory usage, execution times and failure rates. Memory and execution time have limits which you can adjust for your particular usecase. But never forget that every resource you use, you pay for it.
For ML metrics and issues such as accuracy and covariate shift, we need a different solution. See this repo for some suggestions. With AWS, you will only be able to monitor the “SRE” aspects of your deployment. Don’t ignore that part: the Four Golden Signals are as important to ML as they are to any other web application.
Limitations and conclusion
One limitation of the code above is the model pickle being bundled in the Docker image directly. A more sensible architecture would be putting the model in S3 and reading from S3 in the Lambda function. This allows you to use S3 for model management, so you can use features like file versioning. More importantly, you would be able to update a model in production without touching the Docker image.
There are many other avenues of improvement: better error handling in the Lambda function, adding a keep-alive for the Lambda, model versioning using endpoint stages, etc. I also didn’t explore scalability deeply: How can we provision Lambda concurrency? What is the difference between reserved and provisioned concurrency? How would Lambda fare in a load test? How would it compare against a simple Flask server? I will leave the latter as an exercise to the reader.
Finally, I ignored the Serverless framework, which aims to automate and abstract many steps shown here. I tried using Serverless for Deploir and it wasn’t a good match, but a lot has changed since then. I also ignored serverless inference using SageMaker, which provides a similar solution to what I described here. SageMaker offers some advantages, like pre-built Docker images for particular libraries and the model registry, with the disadvantage of being less customizable since you don’t write the Lambda code yourself.
To conclude, I presented one way to go from model to endpoint using AWS Lambda and API gateway. If it makes sense for your use case, feel free to re-use the code and let me know how it goes!
Acknowledgements
I’d like to give my deepest gratitude to the reviewers of this post: Guilherme Lázari, Raphael Tamaki, Rafael Garcia-Dias, Ramon Maciel and Danilo Pereira. At the time of writing of this post, Guilherme, Ramon and Danilo are all AWS engineers, but this post does not reflect any official position from AWS.